
One thing the wood shop constantly produces is small scraps of wood. I believe I have a sickness in the fact that I cannot bring myself to throw out these scrap pieces. The typical result from this wood hoarding is I get so inundated with wood scraps cluttering up the shop, that I take an entire evening and throw them all out to alleviate my frustration. The next day I usually feel very guilty for doing it.
My new plan is to be more organized and sort the scraps according to use. One of those uses is cutting boards. If a scrap is a hardwood, is over 15 inches in length, and doesn’t have large knots, then it can go in the cutting board pile.
I have discovered that hardwood cutting boards are very popular with the women at our church. The boards are fairly simple to make with the right equipment.
A recent request I had was to make a cutting board that included a cross inlay and a burned inscription of a Bible verse. I decided with this project I would document it step by step in case someone else would find this information useful.
Step 1: Glue Up
The first step involves selecting the scrap pieces and coming up with a layout plan. In this case, I had a two inch thick walnut board that was approximately 8 inches wide and over 6 feet long. It had a terrible twist in it, so I knew it would be difficult to use in a project of any size. So I cut it down to use on this project (note: all RTHLC wood is from our mill, so we always have to surface four sides before a project can begin. For that reason, I will skip over that mundane part). I also had some scrap hard maple that I thought would be a great contrast wood for the walnut.
 Once I figured out the pattern I was going to use, it was time for the glue up. This is pretty straight forward, but one piece of advice I would offer is to not be afraid of the glue. Copious amounts of squeeze out is what you want to get good clean seams. Also, the more time you spend in making your glue edges as clean and as smooth as possible the cleaner your lines will look after they dry.
Step 2: Initial Surfacing
Once the glue has dried overnight, it is time to surface the back and face of the cutting board. If you took care to line up your pieces during the clamping process, then you shouldn’t have to remove much of the material. Obviously, having a drum sander makes this a very easy step. If you do not have a drum sander, a hand plane will work as well but will definitely take some time and elbow grease.
 Since this project calls for an inlay, I don’t bother with surfacing the face to its final detail. The inlay will be proud (stick up) once it is done and a final pass through the drum sander will surface the inlay as well as the face.
 Step 3: Trimming
Now that the face and back are surfaced, the board can be trimmed to its final dimension on the table saw. The walnut pieces have some sapwood on the outside that I wanted to leave on for aesthetic reasons. It had some small worm holes just in the sap wood that gave the board some character and an aged look.
Step 4: Prepping the Inlay Pieces
The inlay cross was made from hard maple since it would be a perfect contrast to the walnut and would match the maple stripes as well. One note about wood selection: make sure you do not use any spalted woods in projects that are going to come into contact with food. The spalting is caused by a fungus and can cause sickness if ingested.
I cut out the two inlay pieces that would make up the cross. Depending on the inlay, I sometimes would cut one piece in the shape of the cross to eliminate any lines in the inlay where they overlap, but I like the strength of having long grain on both directions.
I cut the inlay pieces so they are 3/8 of an inch thick. This gives me plenty of material to work with and allows glue surfaces on the sides as well as the bottom. It also allows for the cutting board to be resurfaced on down the road and not surface through the inlay as fast as it would if the inlay was a 1/16 of an inch.

 Step 5: Scribe the inlay
I take the first inlay piece and place it in the proper position. Using a mechanical pencil, I trace the outline. At times, I also score the grain with a razor knife to make sure the grain is separated all around the border.
 Step 6: Routing Out the Material
Using a laminate trim router with a straight bit (pictured in the inset), I route out the material at a depth slightly shallower than the thickness of the inlay piece. I make sure not to go outside of my scribe line but try to get as close as possible.

 Step 7: Clean Out and Paring
Using a sharp chisel, I clean out the routed area all around until I have removed all traces of wood inside the scribed lines. I then pare the backside of the inlay piece to give it a slight angle. This helps get the insertion process started.
 Step 8: Gluing and Placement
Dry fit the inlay piece but not all the way. You will want to be able to remove it for the glue up. Once you are happy with the fit, it is time for the glue. Note: if you are unhappy with the fit and have some gaps around the inlay, don’t worry too much. There is a way to take care of any small gaps at finishing.
Don’t be afraid of the glue. It is your friend. Clean up any squeeze out so it does not affect the quality of your finish.
 Step 9: Plane
Since this is a two step inlay, we need to make the first piece flush with the surface so as not to interfere with inserting of the next piece. I used a hand plane to surface down the inlay piece. Since I just glued it in place, I didn’t want machinery tearing it out.

 Step 10: Tape and Clamp
Once I had the second inlay piece in, I covered the entire inlay with packing tape. This protects the clamps from sticking to the wood as it dries.
There is an old saying in wood working that you can never have too many clamps. Place as many as you can on the inlay to assure a good hold and pressure for the glue. The ideal tool for this would be a vacuum press, but I have not added that to the tool collection yet.
 Step 11: Finish
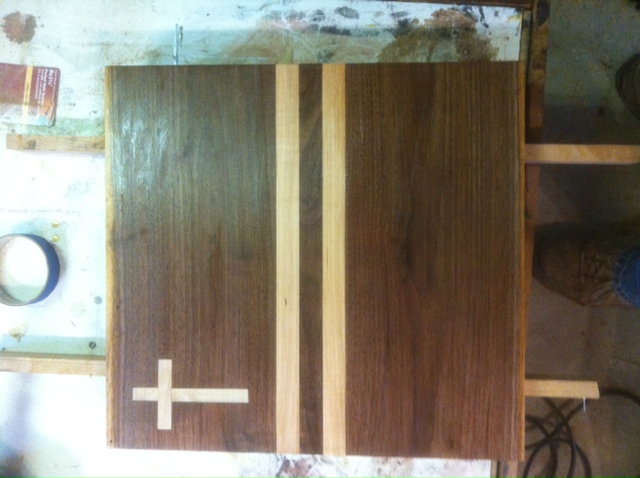
Once the inlay was dry, I resurfaced it to the finished smoothness. I then sanded up to 400 grit to get a nice, fine texture.
For finish, I used a salad bowl finish. This protects the wood but is safe to be used on food contact items. You won’t find this finish at the box stores but you can find it at Woodcrafters or order it online.
One finish technique I love to use is the wet sanding technique. I take a small piece of 400 grit sandpaper and a small lint free cloth. Use the cloth to apply excess amounts of finish to the wood in a small area. At the same time, take the sandpaper and start sanding the finish into the wood. This will create a fine sawdust slurry that will work itself into every crack, crevice, and pore. The walnut is an open grained wood and has a texture to it much like oak. Once this slurry is worked into the grain, it can become smooth as glass.
As you wet sand around your inlay, be sure to work the slurry into any gaps you may have made. This really cleans up the look and matches far better than any filler could.
Reapply salad bowl finish as many times as you like as you step up in sandpaper grit. With time and patience, you can make the board very strong and very smooth.
I hope this detailed description of this cutting board project was helpful or at least interesting. If you have any questions about how to do this yourself, or if you would like to order a custom cutting board, contact us via our contact form.